Blink of LED
Aim
To learn how to connect an LED to an Arduino board and write a code to make it ON and OFF for a specified duration.
Components required for the experiment
Arduino UNO Board, Breadboard, LED (any colour) and Resistor (220 Ohms).
What is LED and where it is used?
LED stands for Light Emitting Diode. An LED is a semiconductor device that emits light when a current flows through it. It is commonly used as an indicator light in electronic devices and for lighting purposes. LEDs are more energy-efficient, have a longer lifespan, and are more durable than traditional incandescent and fluorescent lights. They are also available in a wide range of colours and can be used to create dynamic lighting effects. A resistor in series with the LED pin has to be used to avoid voltage damage.
Circuit Diagram
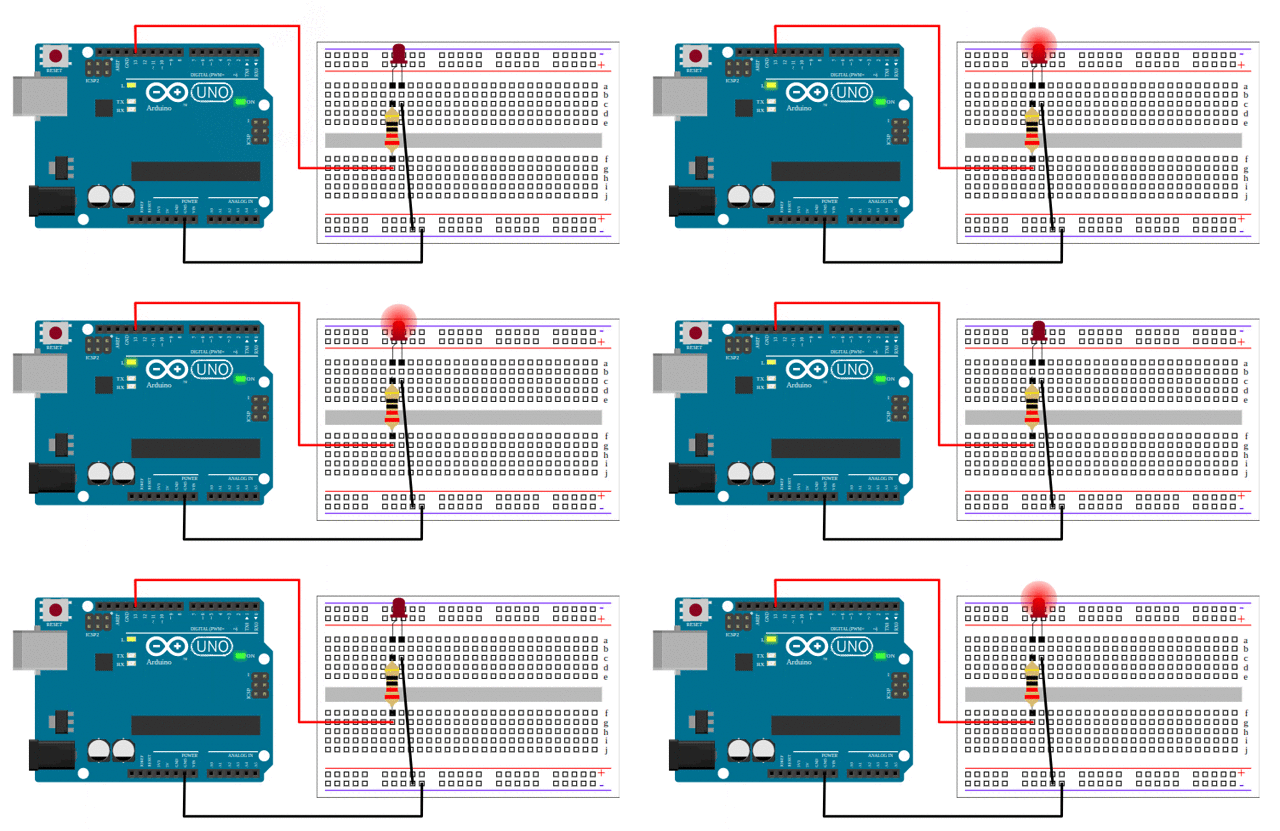
Make the circuit diagram with the exact pin-to-pin connection as shown below to practice. This will help you to complete the experiment successfully.
Code
void setup(){
    pinMode(LED_BUILTIN, OUTPUT);
}
void loop(){
    digitalWrite(LED_BUILTIN, HIGH);
    delay(1000);
    digitalWrite(LED_BUILTIN, LOW);
    delay(1000);
}
Code Explained
This code blinks an LED connected to digital pin 13 to turn ON and OFF every one second.
Now, let's go through the code line by line to understand what each line does:
int ledPin = 13; This line creates a variable named ledPin and sets its value to 13. This is the pin number that the LED is connected to on the Arduino board.
void setup()
{
pinMode(ledPin, OUTPUT);
}
The setup() function is called once at the beginning of the program. This function sets the pin mode of the ledPin to OUTPUT so that it can be used to control the LED.
void loop()
{
digitalWrite(ledPin, HIGH);
delay(1000);
digitalWrite(ledPin, LOW);
delay(1000);
}
The loop() function is executed repeatedly after setup() is called. This function turns the LED ON by setting the ledPin to HIGH and waits for 1 second using the delay() function. Then it turns the LED OFF by setting the ledPin to LOW and then waits for another second using the delay() function. This process repeats forever, creating the blinking effect.
Output
-
Press the start simulation button in the interface.
-
It will turn ON the LED every second.

Conclusion
Interfacing LED with Arduino is a basic step towards understanding the basics of hardware programming and an effective way to learn how to control digital outputs.
Assignment
As an assignment, turn ON the LED for 5 seconds and turn OFF the LED for 2 seconds.

