Temperature indicator using RGB LED
Aim
To learn how to detect temperature with RGB LED using Arduino and TMP36 Temperature sensor.
Components required for the experiment
Arduino UNO Board, Breadboard, TMP36 Temperature sensor, RGB LED and 3 resistors (220 Ohms).
What is TMP36 and RGB LED? Where it is used?
TMP36 is a low-voltage, precision centigrade temperature sensor. It provides an output voltage that is linearly proportional to the Celsius (centigrade) temperature. It is small, cheap and easy to use, and can measure temperatures in the range of -40°C to +125°C.
RGB LED (Red Green Blue Light Emitting Diode) is a type of LED that emits light in three primary colors: red, green, and blue. By controlling the intensity of each primary colour, it is possible to create a wide range of colours. RGB LEDs are commonly used in electronic projects and as lighting in consumer products. They are also used in various applications such as decorative lighting, automotive lighting, and signage.
Circuit Diagram
Make the circuit diagram with the exact pin-to-pin connection as shown below to practice. This will help you to complete the experiment successfully.
Code
int temperature = 0;

int RED_LED = 7;
int BLUE_LED = 3;
int GREEN_LED = 2;
int TMP = A0;

void setup()
{
 pinMode(7, OUTPUT);
 pinMode(3, OUTPUT);
 pinMode(2, OUTPUT);
 pinMode(A0, INPUT);
}

void loop()
{
temperature = (-40 + 0.488155 * (analogRead(A0) - 20));
if (temperature >= 50)
{
digitalWrite(7, HIGH);
digitalWrite(3, LOW);
digitalWrite(2, LOW);
}
else if (temperature >= 0 && temperature < 50)
{
digitalWrite(7, LOW);
digitalWrite(3, HIGH);
digitalWrite(2, LOW);
}
if (temperature < 0)
{
digitalWrite(7, LOW);
digitalWrite(3, LOW);
digitalWrite(2, HIGH);
}
delay(1000); // Delay a little bit to improve simulation performance
}
Code Explained
This program reads the temperature from a TMP36 temperature sensor and changes the color of an RGB LED based on the temperature value. Here's a line-by-line breakdown:
int temperature = 0;This line creates a variable to store the temperature value calculated by the TMP36 sensor.
int RED_LED = 7;
int BLUE_LED = 3;
int GREEN_LED = 2;
These lines define variables for the pins to which the red, green, and blue leads of the RGB LED are connected.
int TMP = A0;This line defines a variable "sensorPin" and assigns the value of the analogue pin to which the TMP36 sensor is connected (in this case, analogue pin A0).
void setup()
{
 pinMode(7, OUTPUT);
 pinMode(3, OUTPUT);
 pinMode(2, OUTPUT);
 pinMode(A0, INPUT);
}
The setup function initializes the serial connection and sets the pins connected to the RGB LED as output pins. The loop function reads the voltage from the TMP36 sensor and converts it to temperature. It then sets the colour of the RGB LED based on the temperature value.
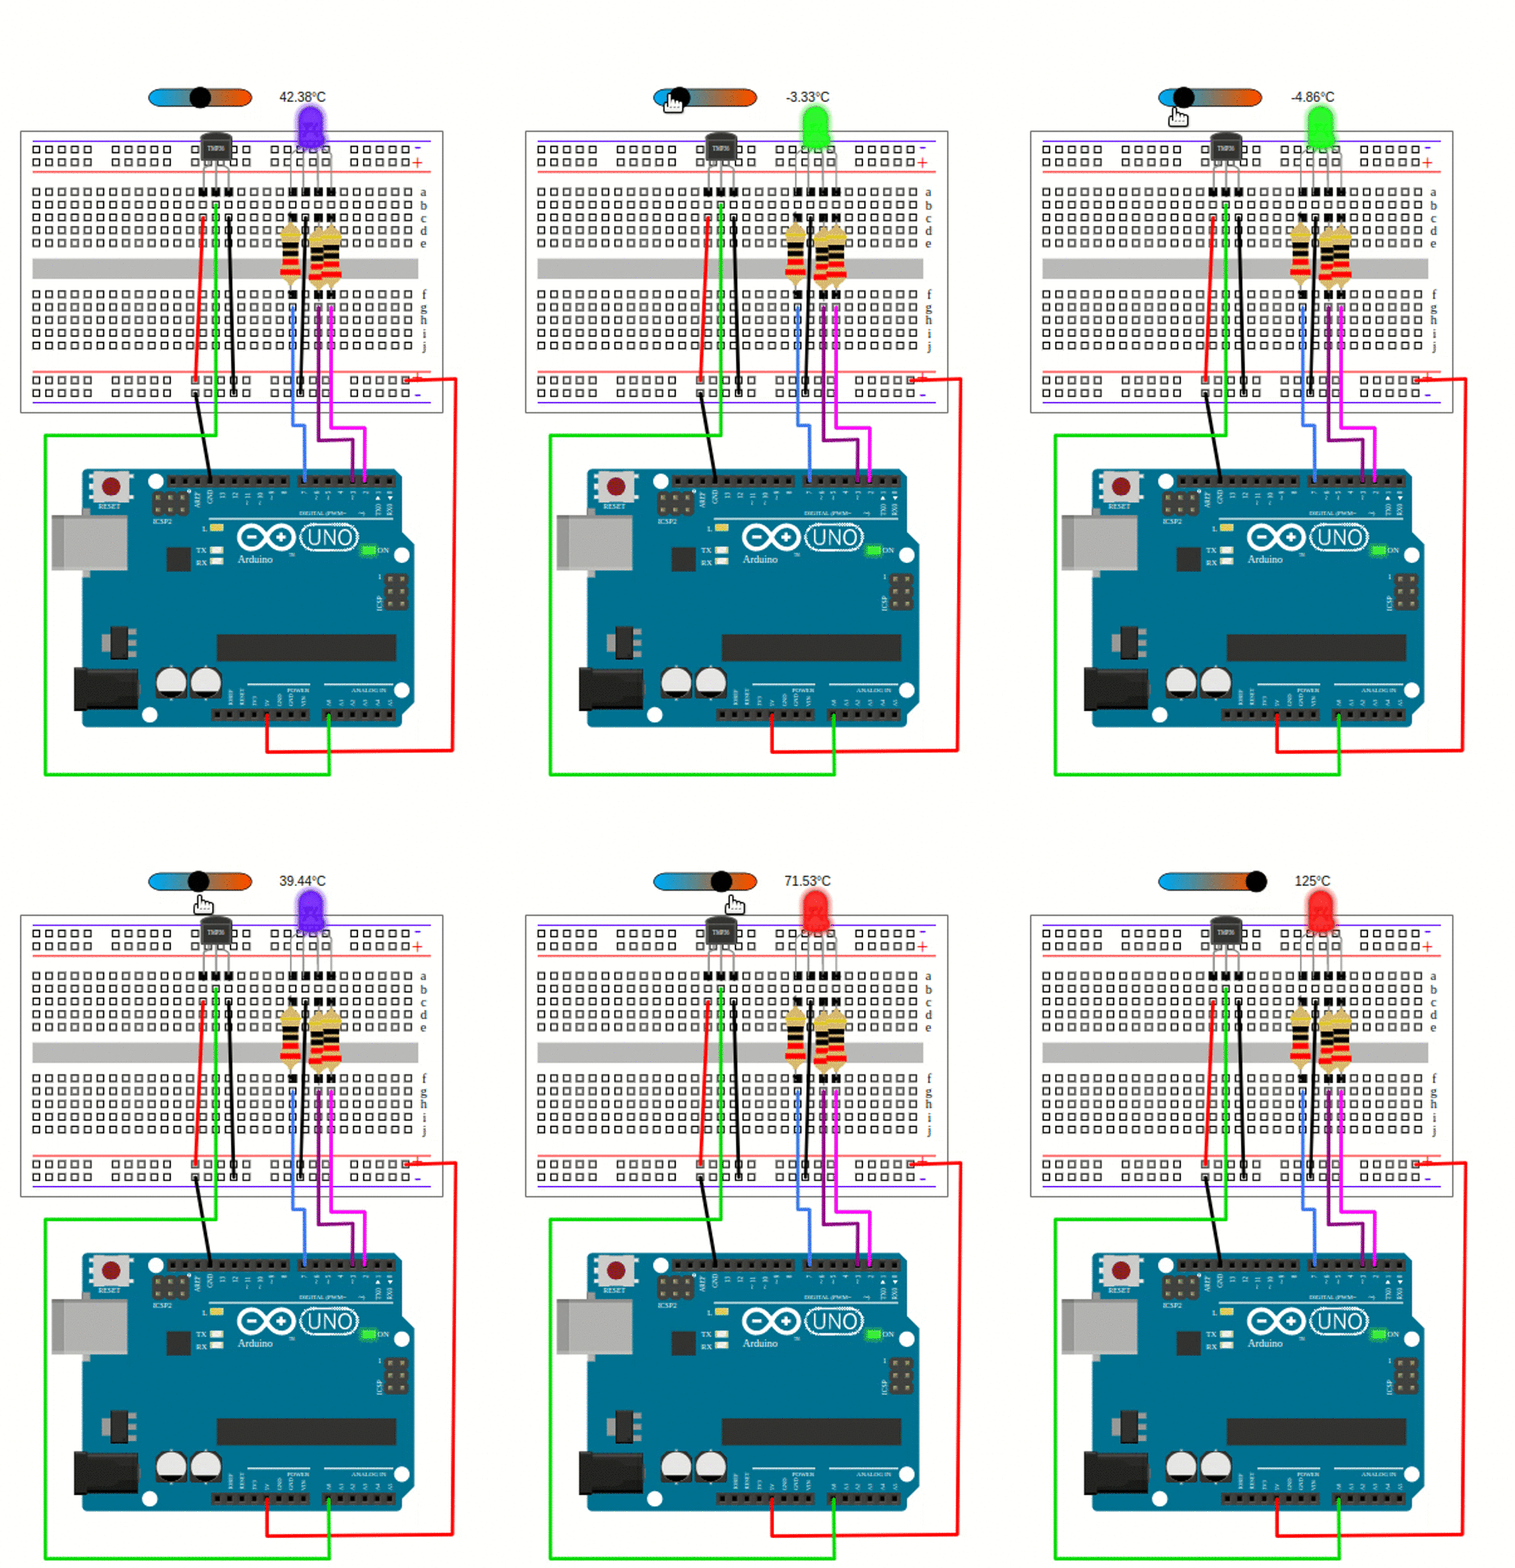
If the temperature calculated by the sensor is between -50 degrees Celsius to 0 degrees Celsius, the RGB LED emits GREEN light. If the temperature is between 0 degrees Celsius to 50 degrees Celsius, the RGB LED emits BLUE light. And if none of these above two conditions is satisfied, the temperature is believed to be above 50 degrees Celsius, to indicate that, the RGB LED emits RED light.
The delay function is used to wait for one second before repeating the loop.
Output
-
Press the start simulation button in the interface.
-
Move the mouse cursor towards the temperature sensor.
-
A slide bar will appear on top of the temperature sensor.
-
Adjust the slider according to your desired temperature value.
-
Observe the LED colour change as you modify the slider.

Conclusion
The TMP36 temperature sensor senses the current environment temperature and accordingly, you can observe the various color changes in the RGB LED.
Assignment
Change the code for RGB LED, for temperature between 0 to 20 degrees, turn on GREEN LED. For temperatures between 21 to 40, turn on the BLUE LED. For temperatures above 40 degrees, turn on the RED LED.


