Display Scrolling Text on LCD
Aim
To learn how to interface a 16x2 LCD to Arduino Uno and to display scrolling text on LCD.
Components required for the experiment
Arduino UNO Board, LCD Display and Breadboard.
What is LCD and where is it used?
LCD stands for Liquid Crystal Display. It is a type of electronic display device that uses liquid crystals to produce visual output. LCDs are widely used in many electronic devices such as calculators, watches, mobile phones, televisions, and computer monitors. They are preferred over other types of display devices because they consume less power, are lightweight and compact, and have a longer lifespan. LCDs are also commonly used in embedded systems, such as those using microcontrollers like Arduino, to display data and user interface information.
Circuit Diagram
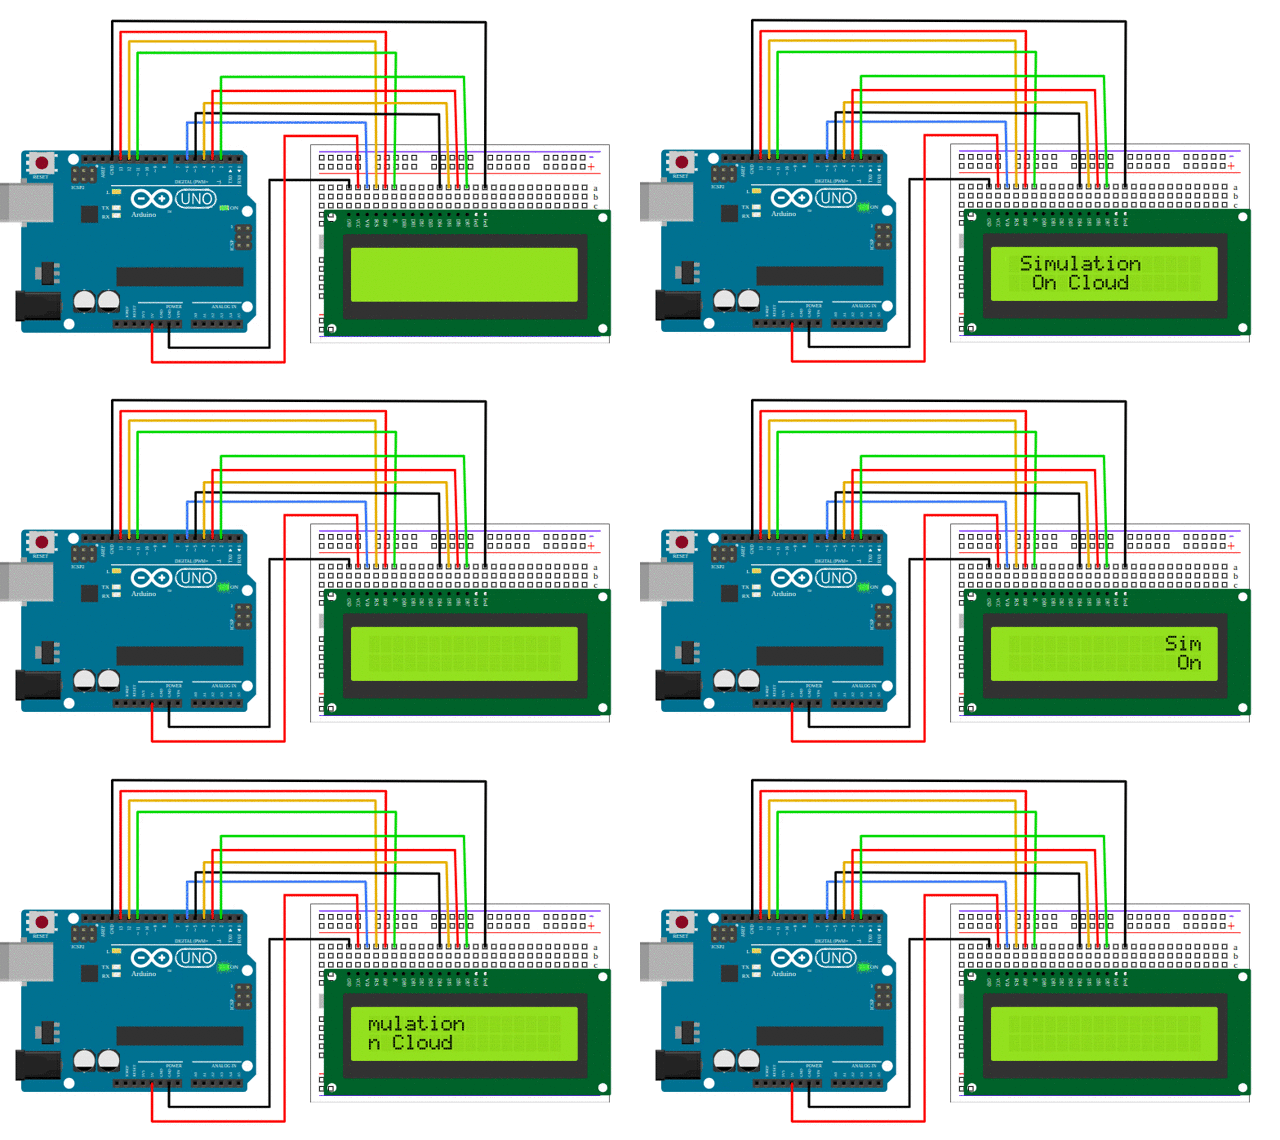
Make the circuit diagram with the exact pin-to-pin connection as shown below to practice. This will help you to complete the experiment successfully.
Code
#include<LiquidCrystal.h>
LiquidCrystal lcd(12, 13, 11, 5, 4, 3, 2);

void setup()
{
lcd.begin(16,2);
lcd.setCursor(14,0);
lcd.println("Simulation");
lcd.setCursor(15,1);
lcd.print("On Cloud");
}
void loop()
{
for (int i=0;i<=22;i++)
{
lcd.scrollDisplayLeft();
delay(70);
}
}
Code Explained
This code displays scrolling text on LCD.
#include<LiquidCrystal.h>
LiquidCrystal lcd(12, 13, 11, 5, 4, 3, 2);
The LiquidCrystal library header file which allows us to use the functions and methods provided by the library. Next line creates an object lcd of the LiquidCrystal class, which is used to control the LCD module. The parameters 12, 13, 11, 5, 4, 3, 2 are the pin numbers used for RS, E, D4, D5, D6, and D7 of the LCD module respectively.
void setup()
{
lcd.begin(16,2);
lcd.setCursor(14,0);
lcd.println("Simulation");
lcd.setCursor(15,1);
lcd.print("On Cloud");
}
The setup function is called once when the microcontroller starts. Initialise the LCD module with 16 columns and 2 rows. Then set the cursor on the 14th position of the 1st line (line 0 of LCD) and write "Simulation" to print the same on the line. Similarly, set the cursor on the 15th position of the 2nd line (line 1 of LCD) and write "On Clouds."
void loop()
{
for (int i=0;i<=22;i++)
{
lcd.scrollDisplayLeft();
delay(70);
}
}The loop function is called repeatedly after the setup function.
We now create an integer i and set up the maximum limit to 22. For every shift of words, the count will increase. The LCD is set to scroll in the left direction. This means the words "Simulation" on line 0 and "On Clouds" on line 1 will move from the right-hand side to the left. A time delay of 70 milliseconds is given.
Output
-
Press the start simulation button in the interface.
-
As a result, the LCD will display the scrolling text that is written in the code.

Conclusion
In this exercise, we have learnt how to interface a 16x2 LCD with Arduino Uno and to scroll the text appearing on the LCD.
Assignment
Change the code to scroll the text on the screen to the right side.
