Control LED with Push Button
Aim
To learn how to turn ON or OFF an LED with a Push Button using Arduino Uno Board.
Components required for the experiment
Arduino UNO Board, Breadboard, LED (any colour), Resistor (220 Ohms) and Push Button.
What is a push Button and where is it used?
A push button switch is a type of mechanical switch that is activated by pressing a button. It is typically used to provide a momentary contact closure that can be used to control electronic circuits. When the button is pressed, it completes an electrical circuit, allowing current to flow through the circuit. When the button is released, the circuit is broken and stopping the current flow. Push button switches are commonly used in a variety of electronic applications, such as control panels, and keyboards, and as input devices for microcontrollers like the Arduino. They are often used in combination with other electronic components to create more complex circuits and systems.
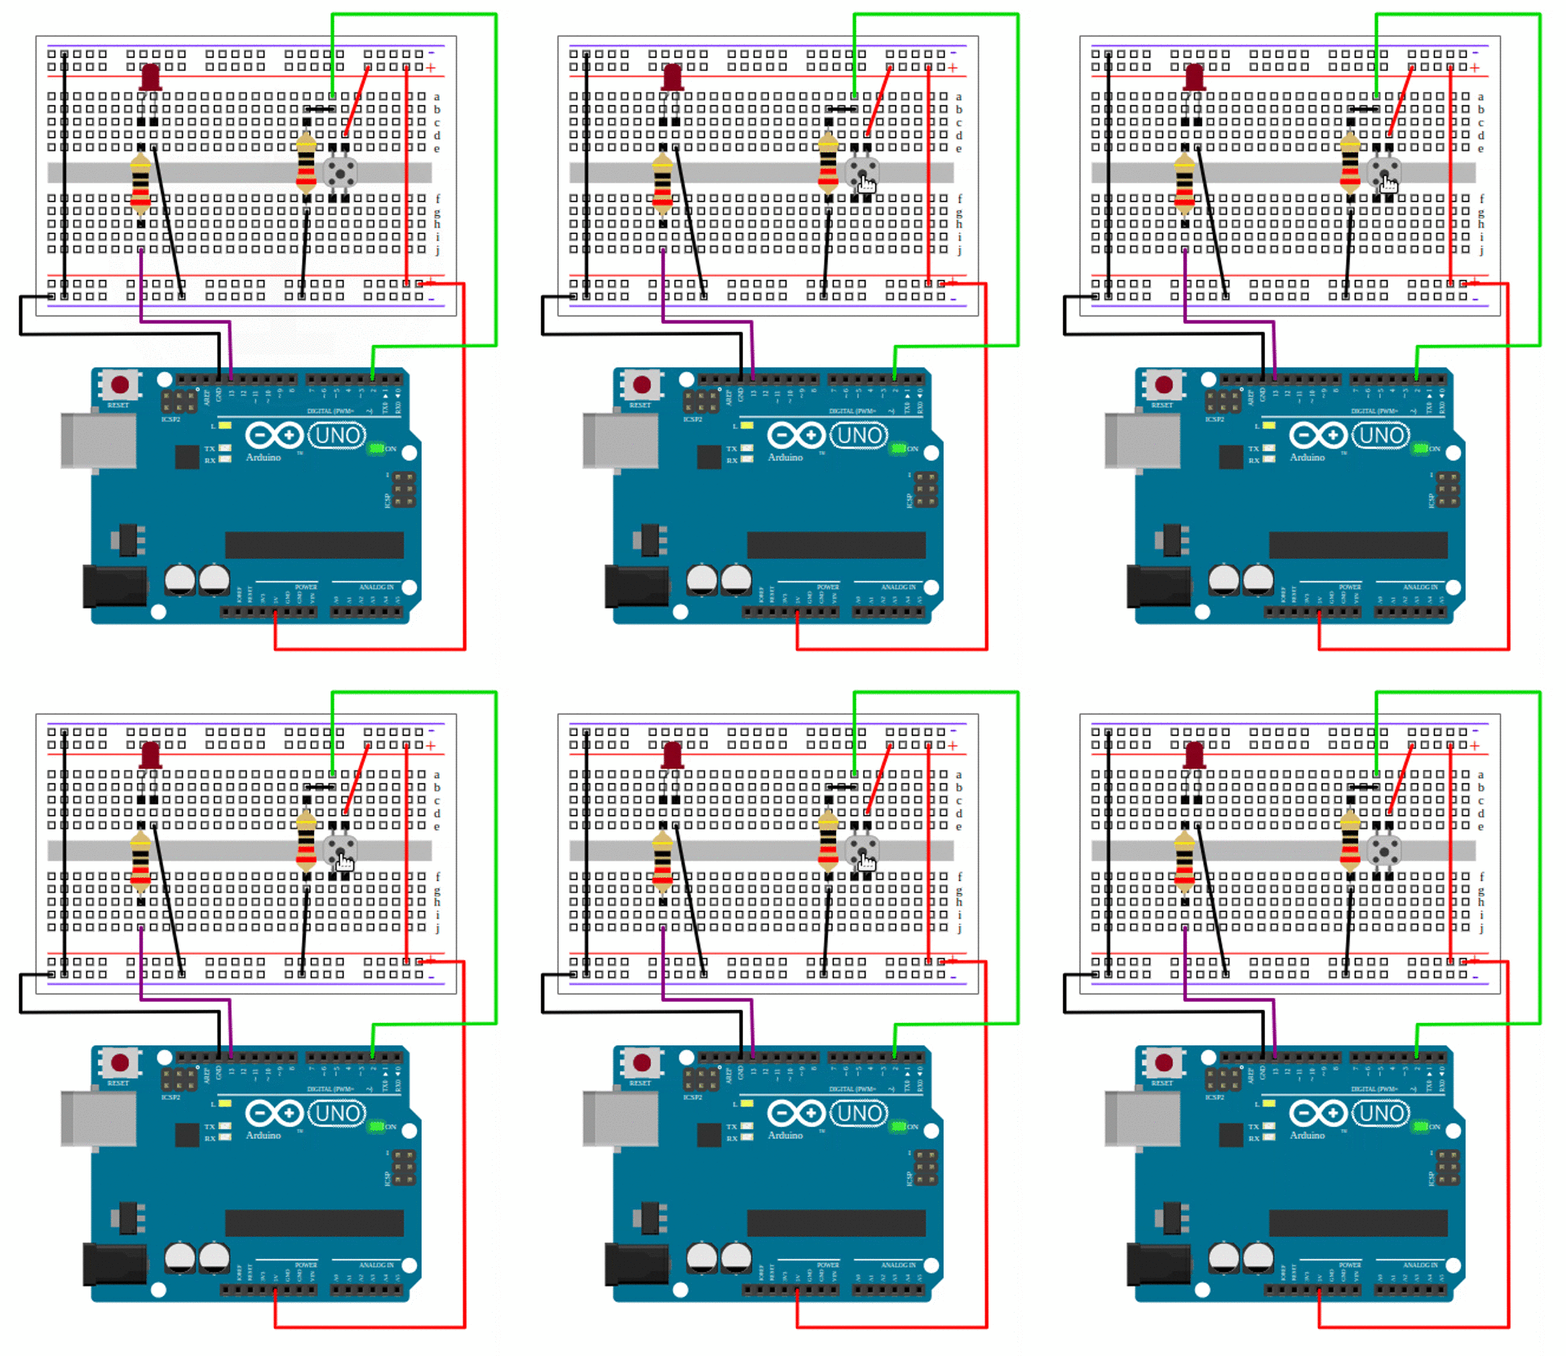
Circuit Diagram
Make the circuit diagram with the exact pin-to-pin connection as shown below to practice. This will help you to complete the experiment successfully.
Code
// initialize variables
int ledPin = 13; // LED connected to digital pin 13
int buttonPin = 2; // pushbutton connected to digital pin 2
int buttonState = 0; // variable to store button state

void setup()
{
pinMode(ledPin, OUTPUT); // set the digital pin as output
pinMode(buttonPin, INPUT); // set the digital pin as input
Serial.begin(9600); // initialize serial communication at 9600 baud rate}
}
void loop()
{
buttonState = digitalRead(buttonPin); // read the state of the pushbutton
if (buttonState == HIGH) // if the pushbutton is pressed
{
digitalWrite(ledPin, HIGH); // turn ON the LED
Serial.println("Button pressed"); // print message to serial monitor
delay (500);
digitalWrite(ledPin, LOW);
}
else // if the pushbutton is not pressed
{
digitalWrite(ledPin, LOW); // turn OFF the LED
}
}
Code Explained
This code turns an LED ON and OFF based on the state of a push button connected to digital pin 2. It also shows the state of Push Button on serial monitor.
Now, let's go through the code line by line to understand what each line does:
int ledPin = 13;        // LED connected to digital pin 13
int buttonPin = 2;      // pushbutton connected to digital pin 2
int buttonState = 0;    // variable to store button state
The code begins by defining two integer constants buttonPin and ledPin, which represent the digital pins to which the pushbutton and LED are respectively connected.
Then, an integer variable buttonState is defined and initialized to 0. This variable will be used to store the current state of the pushbutton.
void setup()
{
pinMode(ledPin, OUTPUT);       // initialize LED pin as an output
pinMode(buttonPin, INPUT);     // initialize pushbutton pin as an input
Serial.begin(9600);            // initialize serial communication
}
In the setup() function, the pinMode() function is used to set the LED pin as an output and the pushbutton pin as an input.
The Serial.begin() function is also called to initialize the serial communication at a baud rate of 9600.
void loop()
{
buttonState = digitalRead(buttonPin); // read the state of the pushbutton
if (buttonState == HIGH) // if the pushbutton is pressed
{
digitalWrite(ledPin, HIGH); // turn ON the LED
Serial.println("Button pressed"); // print message to serial monitor
delay (500);
digitalWrite(ledPin, LOW);
}
else // if the pushbutton is not pressed
{
digitalWrite(ledPin, LOW); // turn OFF the LED
}
}
In the loop() function, the digitalRead() function is used to read the state of the pushbutton and store it in the buttonState variable.
If statement checks if the buttonState is HIGH or LOW.
If the pushbutton is pressed, the buttonState is HIGH. The digitalWrite() function is used to turn the LED on, and a message "Button pressed" is printed to the serial monitor using the Serial.println() function.
If the pushbutton is not pressed, the buttonState is LOW. The LED is turned off using digitalWrite().
This code will turn ON or OFF LED with the push button and print a message to the serial monitor every time when the push button is pressed.
Output:
-
Press the start simulation button in the interface.
-
Click the centre point in the pushbutton with the mouse which indicates the button press.
-
It will turn ON the LED.
-
When you release the mouse button, the LED is turned OFF.

Conclusion
In this exercise we learned how to use the Push button switch to control the LED. You have also learned the use of a serial monitor and to see the output. A Serial Monitor is widely used for debugging your program.
Assisgment
Change the code and turn OFF the LED when the button is pressed. The LED should be ON when the push button is not pressed.


